
This blog is my peripheral medical brain and this is where I place the notes I make on medical topics I want to remember.
Dr. Weingart’s outstanding Podcast 176 – Updated EMCrit Rapid Sequence Intubation Checklist [link is to the show notes and vidcast] is a clear and practical review of RSI.
_________________________________________________
8-04-2019
Here is a link to the Vidcast on YouTube. [I just rewatched this excellent video which is only 20 minutes long but really is, to me, the best way to review this life-saving procedure [meaning Dr. Weingart’s RSI Checklist].
See also EMCrit Wee – An Amazing (Wearable) Cric Trainer from Laura Duggan and the Airway Collaboration Folks
July 24, 2017 by Scott Weingart.
__________________________________________________
Dr. Weingart’s blog is EMCrit and is a resource for every clinician (MD, DO, DNP, Nurse, PA, Paramedic, and EMT) who might suddenly be responsible for the care of an acutely unstable patient. If you practice outside of major teaching institute, you and your immediately available colleagues may be all that stands between the patient (child or adult) and death.
Fortunately, the excellent Emergency Medicine teachers have done their best to help all of us on their many excellent blogs, podcasts, and YouTube videos.
In the vidcast, Dr. Weingart goes through, step-by-step, his revised EMCrit Rapid Sequence Intubation Checklist [Here is a Link to a Printable Version of the Checklist which is made to be printed on a wallet sized card like a business card size]:
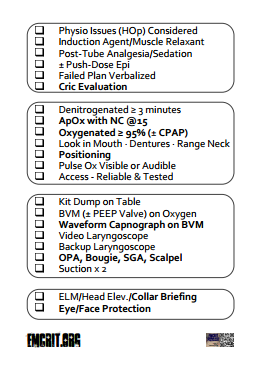
Note that there are four seperate boxes in the above figure:
- The Planning Box
- The Patient Box
- The Equipment Box
- The Team Box
In his vidcast he goes over each of the check boxes in each of the four main boxes.
Box One – The Planning Box
2:01 – 3:10 This is where we ask ourselves if this likely to be a physiolgically difficult intubation meaning that the patient has or is at risk for hypotension, has or is at risk for hypoxia, or has a severe metabolic acidosis [The HOp killers]. We need a plan to deal with any of these issues.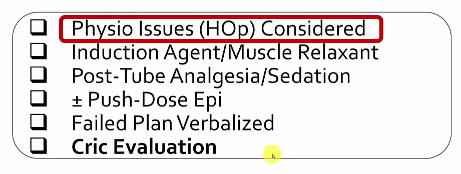
3:10 – 3:30 This is when you want to ask for your induction agent/muscle relaxant so that it is ready when you are. 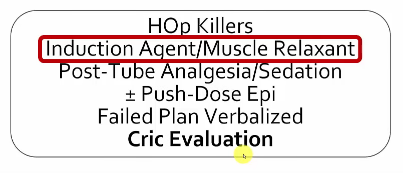
3:30 – 5:02 And this is how Dr. Weingart wants the syringes labeled. And for each intubation, there are standardized amount syringes for every medicine that we want so that we don’t have to think about it. And because we have them labeled in mg/ml we can always tell how much of a medicine we have left in a syringe.
You’re given 10 cc of rocuronium. You’re given 10 cc of succinylcholine. You’re given 20 cc of propofol. You’re given 20 cc of ketamine [the picture below shows a 10 cc syringe of ketamine which is not what we want]. You’re given 10 ml of etomidate. Etcetera, Etcetera. And then you are just handed that. And then you can decide what to use.
And if you need more [medicine] because you have a morbidly obese patient, then you can say – I’d like two syringes of etomidate. No problem but you don’t have to figure out exactly what you are going to use before you’re ready to use it.
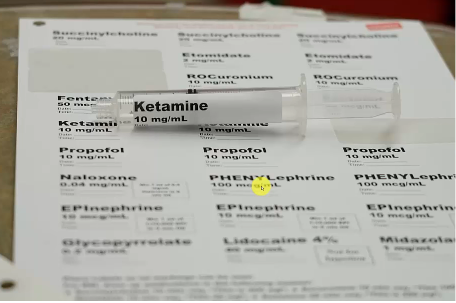
And he supplies us with a printable 8 1/2 x 11 template of labels for all your RSI medications [Link is to a download of the form] . We use these to label each of our syringes – outstanding. Here is the template:
And these are the standard amounts of medications we want in the syringes for each RSI, Dr. Weingart states. And we do not want messy handwritten mistake prone labels on the syringes.

And here are Dr. Weingart’s directions on using the labels:

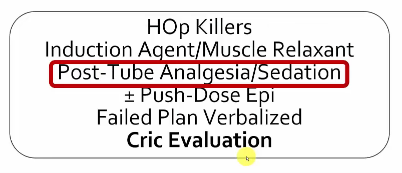
5:03 – 5:25: Dr. Weingart says:
Ask for the post tube analgesia and sedation now. You don’t have to wait until it comes to intubate. But at least now you have sped up the process of getting it by five or six minutes.
5:25 – 6:25 Dr. Weingart states:
If you think that the patient has any chance of decompensating, either from a heart rate or blood pressure perspective, then just mix up some push dose epi – easiest thing in the world. We actually have an epinephrine label which says 10 mcg/ml. And the mixing instructions are actually on the label itself. [The directions are not on the downloadable template above.]
However, in the video,Dr. Weingart reminds us how to prepare the 10 cc syringe of epinephrine 10 mcg/ml.

These figures on mixing epinephrine are from Dr. Mellick’s YouTube video Pulse Dose Epi During Intubation: 
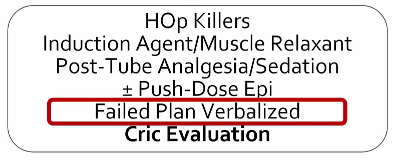
6:20 – 9:50 Dr. Weingart next goes over the failed airway plan:
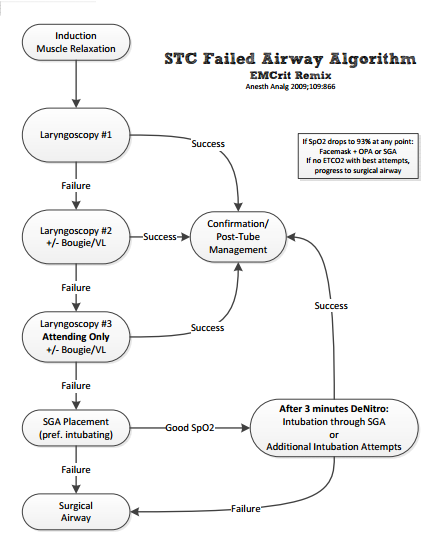
Failed airway plan verbalized. This is key. Not just having a failed airway plan but saying it to everyone in the room. So the supervisor or the actual person doing the intubation has to say every step of the failed airway plan. If you have your own or if you use [name?] Vortex, verbalize that. But for me it will always be the the shock trauma failed airway algorithm. I have, of course, updated because this is the EMCrit remix.This is the newest version of the EMCrit remix. I think it’s damn near perfect. [From 7:20 – 7:20 Dr. W goes quickly through the algorithm. You stop at three laryngoscopy attempts.] Because you are going to move on to other things. And what you’re going to fail to is the intubating supraglottic. If you don’t have an intubating then use whatever supraglottic you’ve got but I really feel that you should be using a second or third-generation supraglottic which means they have a gastric port and they allow easy intubation through them. For us currently it is the i-gel. And you should place that and if you fail that you should move to surgical airway.
But if you are able to get good sats with the intubating LMA then stop. Regroup. And get everything back to a healthy state of mind.Get the patient’s sats up to 100 [%]. Get them well denitrogenated. Get them in a perfect physiologic state. You know, optimize blood pressure – whatever. This is what is called the Green Zone in the Vortex approach.
And then you can try additional laryngoscopy attempts if you’re going to learn from your mistake. You can choose to take out the supraglottic and try again or have someone else try again after everything is back to a beautiful beautiful condition or you could just intubate through that supraglottic.
If that fails, if the patient sats don’t improve then you go back to surgical airway.
Dr. Weingart gives us a link to a pdf printable version of the Failed Airway Algorithm below:
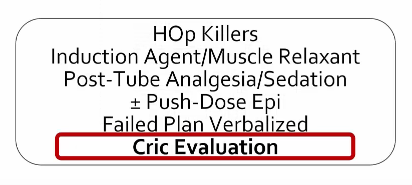
10:02 – 10:02 Next Dr. Weingart goes over cric evaluation:
Cric evaluation, the last part of the box for plan. This involves CriCon2 which I discussed in the previous podcasts.
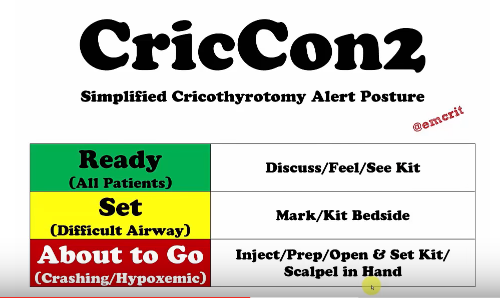
Cricon2 Green Zone:
Every patient, every patient is at least in the Green Zone.
That means for every patient you intubate you discuss that the end-stage of your failed airway plan is surgical airway – front of the neck access.
You felt the anatomy. You felt it coming up from the sternal notch. Upwards – not coming from the chin downwards or else you will surely be in the hyo-thyroid. You felt the anatomy and you know what you are dealing with. And if you didn’t feel any anatomy then you know you have to make a bigger incision.
And you visualize the kit in the room. It doesn’t need to be at the bedside. It doesn’t need to be open. And that visualization might have been that you checked your locked airway cart and it’s there.
So that’s Green. And the kit, if you’ve listened to EMCrit is a scalpel [Dr. Kovacs in his videos on Cric recommends use of a #10 blade scalpel], a boogie, and a set of endotrachial tubes that includes a 6.5 cuffed tube. That’s it. That’s all you need.
Cricon2 Yellow Zone:
Yellow is a patient that has been predicted to be difficult but you’ve still decided to go ahead with RSI.
And for those patients you will mark the neck. The mark and yes maybe it will help you find the anatomy a little bit quicker but that’s not what it’s for.
It is psychological. If you mark the neck everyone in the room knows – this is for real. You’ve violated the patient’s personal space. You’ve drawn a mark on them. It breaks down the barriers to you doing a cric.
And now the kit is at the bedside which means you see a boogie, you see a scalpel. And you might even want to put the 6-0 Portex trach at the bedside. You don’t necessarily need to open them. [But] they’re there on the table ready to go.
The Red Zone (the crashing/hypoxemic patient):
Someone has scalpel in hand, the kit is open, and he/she is ready to perform the cricothyrotomy when the team leader gives the word.
Box Two – The Patient Box
12:20 – 13:02 Dr. Weingart next goes over denitrogenation.
Denitrogenated for greater than or equal to 3 minutes. This is separate from the preoxygenation. I put preoxygenation as the saturation reading which we will get to in a second. And denitrogenation is getting the nitrogen washout of the alveoli and for that it is purely time. You need a high FiO2 source which for me is nonrebreather plus nasal cannula or CPAP mask plus nasal cannula or BVM with Peep valve plus nasal cannula. Three minutes high FiO2 regardless of the pulse 0x.
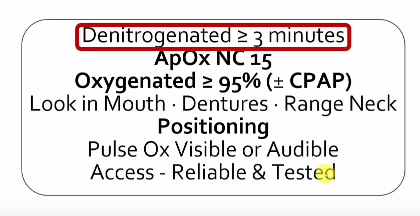
13:02 – 13:12 Dr. Weingart reminds us that we need to put that nasal cannula on at 15 liters/min underneath anything else you do for apneic oxygenation. 
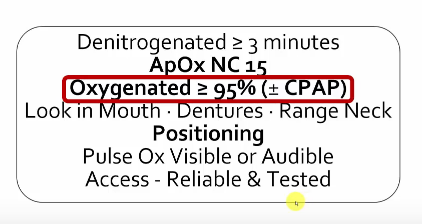
13:13 – 13:37 Dr. Weingart reminds us that we need to get O2 sat up to greater than or equal to 95%:
If you haven’t [got them up to or greater than 95%] with whatever else you are doing, consider putting them on CPAP at somewhere between from 5 to 15 cm of water to see if you can get those sats up to see if you can get those sats up to greater than or equal to 95%.
And if you get to 15 cm and you still can’t do it, then you have no choice. You have to go forward. You may choose to RSI them or you may choose to do an awake and leave them spontaneously breathing.
13:38 – 14:04 Dr. Weingart goes over looking in the mouth, checking for dentures, and checking range of motion of the neck assuming they are not in spinal precautions. If they are wearing dentures, leave them in while you are bagging and take them out when you are ready to intubate. By ranging the neck you will find out if the patient has restricted range of motion from an arthritic condition or spinal fusion which will make the intubation more difficult.

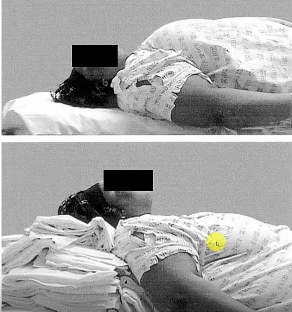
14:04 – 14:22 Positioning:

We know this. Thank you Rich Levitan. Face plane parallel to the ceiling with the ears [external auditory meatus] horizontally aligned with the sternal notch.
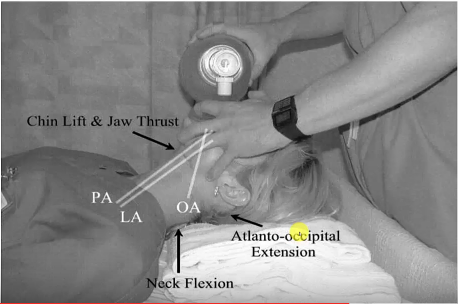
This patient [picture below] is impossible in the picture on the top. And pretty easy on the bottom picture.
14:23 – 15:19 Pulse Ox audible or visible:
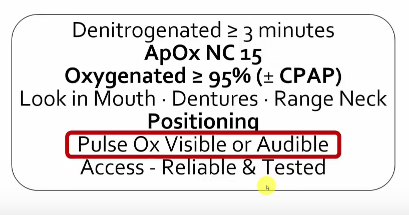
And the anesthesiologists, they like it audible. I don’t like that. I like seeing the pulse ox.
And one easy way, for the purpose of the intubation to see the pulse ox, is to turn the bed so the monitor is visible to you and you’ll also be able to see the capnography waveforms and numbers.
Just turn your stretcher to near horizontal to the screen.
15:21 – 15:33 IV Access:
You need reliable IV access, preferably two. But it [they] should be tested. It should be slammed with a flush to make sure it isn’t blown.
And if you have any issues, you don’t mess around. You just put in an IO if you’re intubating and get [secure IV] access afterward.

Box Three – The Equipment Box
15:35 – 16:27

There is a kit dump on the table. What does that mean? That means that there is nothing on the patient’s chest or on the bed or on some tiny crappy little mayo stand somewhere.
You have a real sized table next to you at either the supervisor’s or the intubator’s hand ready to go.
[The mayo stand] is useless. Do not put anything on them. Throw them away.
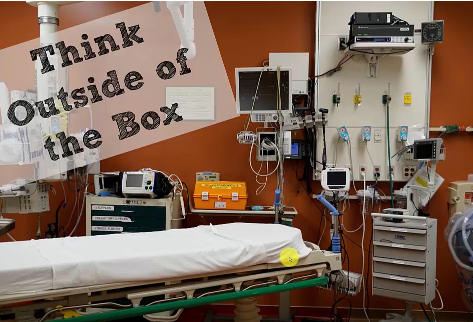
This [picture below] is what they do in EMS. They get 360 degree access and they dump their kit in away that everything is immediately accessible and available.
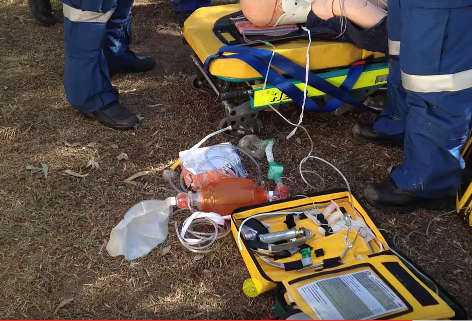
We do the same the same thing in the hospital. We get a big table. This [the picture below] is our kit dump kit. I love this. If you don’t have this – no problem. Just put everything on a big table laid out ready to go.
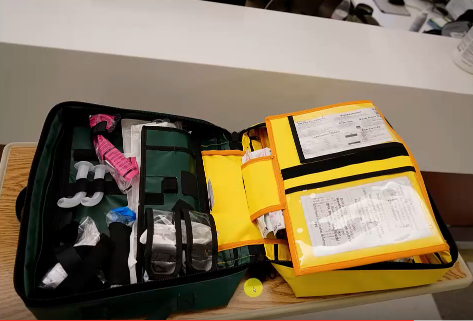
This [the picture below] is the other side. This is where we have our difficult airway stuff, our supraglottics, our boogies, and our surgical airway equipment.
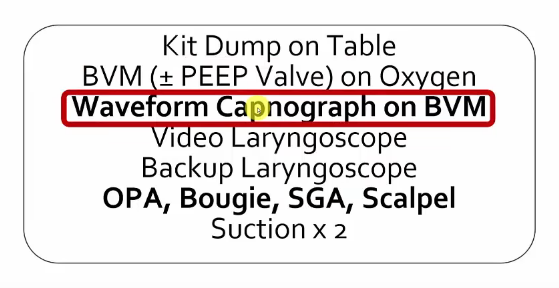
16:28 – 17:09 BVM (+/- PEEP Valve) on Oxygen AND Waveform Capnography on BVM
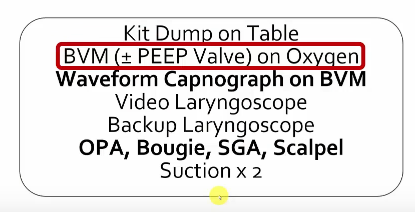
Prep your BVM. People really really screw up BVM ventilation. So make it as easy as possible. You’ll see [Red Box above] BVM on Oxygen +/- PEEP valve and then Waveform Capnograph on the BVM.
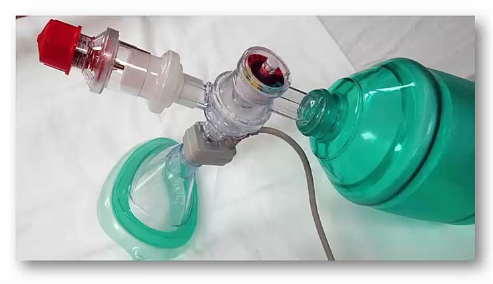
Those two parts lead to this:
This [picture below] is a BVM. Ours is lovely because it has a pressure gauge attatched to [keep you from using excessive ventilation pressures]. There is our PEEP valve. There is our one way valve and there is our waveform CO2 which means that every patient [the grey colored pieces] which means that every breath delivered with this device whether it be to a spontaneously breathing patient, a patient we’re bagging, a patient we’re ventilating through supraglottic, or a patient we’re ventilating through an ET tube – we get immediate confirmation that the breaths are working with waveform end-tidal CO2.
17:10 – 18:04 Video Laryngoscopy AND Backup Laryngoscope
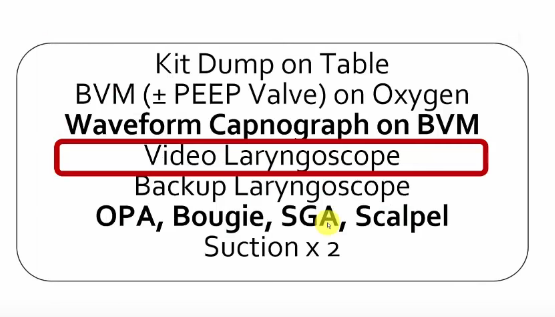
[You need to have] A video laryngoscope. [That] doesn’t mean that you need to use it. Your choice. But it better be in the room.
I think that every intubation that is currently done should be done with a video laryngoscope in the room. And whether or not you chose to use it is up to you.
And if it [the video laryngoscope] has a standard geometry blade [I think Dr. Weingart means here a MacIntosh configured video laryngoscope as opposed to having a hyperacute angled blade like the Glidescope] there is no reason not to do it [there is no reason not to use the video laryngoscope] because the light is better than any laryngoscope out there. It is gorgeous and you only have to look up at the screen to convert to video or vice versa.
So it is my rec but if you want to use a standard [direct] laryngoscope, no problem. But I think a video laryngoscope should be in the room.
And there is your non-video laryngoscope right there on the checklist. Make sure that there is a backed up laryngoscope, standard geometry, regular Macintosh old school blade.
We have disposables now that I love and it means I don’t have to worry about checking (does the light work? – does the battery work?) because it always works now.
18:05 – 18:52 OPA, Bougie, SGA, Scalpel AND Suction x 2
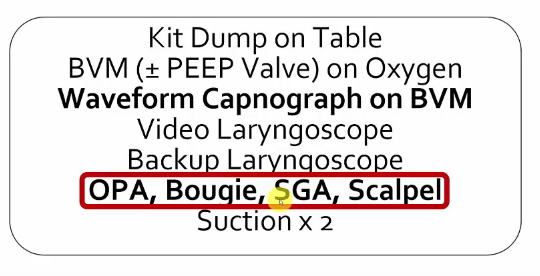
And on your table you have an oropharyngeal airway and honestly the size doesn’t matter because the purpose of this device is not to keep the tongue forward. It might help with that but that really should be a good head tilt – chin lift – jaw thrust. It [the OPA] is to keep the teeth open so that when you are ventilating you are not ventilating in a dead space because the nose is filled with the nasal cannula and if the mouth is not kept open [then] when you do the head tilt – chin lift that is when it [the mouth] closes. That is why the oropharyngeal airway is there.
Always a boogie at every single intubation.
Always a supraglottic airway preferably an intubating SGA present at the bedside at every intubation for the right size for the patient on that kit dump table.
And then a scalpel. And I don’t care if it is an 11 or 10 – whatever you like. But it’s there.
And all that stuff is laid out on that table so that if you need it you don’t have to ask anyone for anything.

And then two suctions tested and checked.
Box Four – The Team Box
18:57 – 18:57
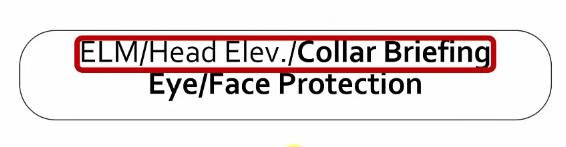
Anyone around the bed (I’m skipping around) must have eye and face protection on because you will get splatter especially if you go surgical.
And then this top box – you brief someone for external laryngeal manipulation [ELM] which means you say: If I ask you to put your hand on the neck, you’ll put it right on the thyroid [cartilege] and you’ll show them right where it is. Just let me move you wherever I want and you keep your hand there.
Brief someone for head elevation meaning you tell them: Look, if I lift the head to get a better view and I say – take this over.
Just keep the head in the exact position I put it.
And then if the patient is in in-line stabilization, you brief someone on the proper way to do that. And as we’ve talked about that with [Dr.] George Kovacks that means ear muffs.
Have them put their hands over the ears and their job is to keep you from lifting the head off of the bed. That is their only role.
And, if you tell them to let up, they let up.
That’s the briefing because sometimes getting the airway is more important than whether or not the head moves off the bed by two inches.
So, if you say let up, they better understand to do that.
There you go. That’s the new checklist. I’d love to hear what you think. Any suggestions. Any improvements. And that’s it.
emcrit.org/airway has everything emcrit airway in one place. And you can find all sorts of good stuff there.
Scott Weingart, EMcrit podcast saying bye-bye.


