Note: In addition to today’s resource, there are many excellent YouTube teaching videos on IV vascular access using POCUS. To see a list of teaching videos I have reviewed, please go to the Categories box at the far right and click on “Select Category” in the Categories box. You will see a long list of topics covered in this blog. Click on “POCUS For Vascular Access”. You will get a list of blog posts on the topic.
A good teaching video for “POCUS For Vascular Access” is Ultrasound Guided Vascular Access:
Oct 19, 2023 Procedural UltrasoundIn this lecture from our Ultrasound Grand Rounds, Dr. Matthew Tabbut, MD talks how to use ultrasound to guide vascular access. Follow us on Online and on Social Media: Website: https://www.metrohealth.org/pocus Twitter:
/ mh_emultrasound Instagram:
/ mh_emultrasound
Today, I review, link to, and excerpt from How I Teach: Ultrasound-guided’s Peripheral Venous Access. [PubMed Abstract] [Full-Text HTML] [Full-Text PDF]. ATS Sch. 2022 Oct 26;3(4):598-609. doi: 10.34197/ats-scholar.2022-0029HT. eCollection 2022 Dec.
All that follows is from the above resource.
Abstract
Ultrasound-guided peripheral intravenous (IV) placement is often required for patients with difficult IV access and is associated with a reduction in central line placement. Despite the importance, there is no standardized technical approach, and there is limited ability to attain mastery through simulation. We describe our step-by-step approach for teaching ultrasound-guided IV placement at the bedside using short-axis dynamic guidance, with emphasis on advancing the needle and catheter device almost entirely into the vessel before threading the catheter. Our teaching approach allows the opportunity for trainees to maximize the learning potential of a single insertion experience, which includes focused preprocedure hands-on practice, instruction with real-time feedback at the bedside, and a post-procedure debrief with reinforcement of concepts.
Copyright © 2022 by the American Thoracic Society.
Intravenous (IV) access is essential in hospitalized patients, and poor IV access is a common reason for central line placement. Peripheral IVs are associated with a lower infection risk and fewer placement complications (1, 2). Using ultrasound can reduce the number of attempts required to place peripheral IVs in patients with one or more failed IV attempts, no visually identifiable vein, or previous difficult IV placement (3, 4). Ultrasound-guided peripheral IVs (USPIVs) allow clinicians to avoid central lines, remove existing central lines, improve patient satisfaction, and safely administer vasoconstrictive agents (4–10). Novice members of the team are often called to place IVs after multiple expert staff have failed, highlighting the importance of this skill.
Who Are the Learners?
Our technique is aimed at teaching anyone learning USPIV placement, including but not limited to students, postgraduate trainees, and nurses. There are many techniques described to place USPIVs, including Seldinger technique, long axis, short axis, static, and dynamic guidance (11, 12). The published literature on teaching USPIV placement often includes didactic lectures followed by practicing on models, although these studies focus on teaching medical students, technicians, nurses, or emergency medical services workers and are 2–8 hours in length (13–16). Many training programs do not have the bandwidth or experienced faculty to teach this skill in a workshop format to learners in the intensive care unit (ICU) and on general medicine floors. We present a method of teaching USPIVs that was developed by one of the authors’ experiences teaching residents, hospitalists, and advanced practice providers, while building, directing, and then handing off a bedside procedure team (17). Our method has been used across multiple institutions for many levels of learners, providing a broadly applicable approach in a setting where mastery through simulation may not be feasible.
What Is the Setting?
The teaching is most commonly performed in the inpatient setting in the emergency department, medical floors, or ICU, typically after failed attempts by members of the healthcare team using conventional IV placement methods.
What Is the Approach?
Given the limitations in time and resources for teaching this core skill, we use a “just in time training” (JITT) strategy to efficiently prepare the learner for the combined educational and procedural experience they are about to undertake. Procedural JITT facilitates practice of a skill immediately before performance of it in a live clinical encounter to improve patient safety and trainee learning and confidence. As investigators discovered in a qualitative analysis of JITT for pediatric lumbar puncture training, learners found JITT to be useful for reviewing anatomic landmarks, rehearsing steps, asking questions, and troubleshooting based on prior experience or areas of misunderstanding (18). The nature of this on-demand teaching ensures its relevance to the trainee’s immediate learning needs and retention, given the temporal proximity of the learning to the actual skills performance.
During the briefing, we conduct a mini-simulation, allowing the trainee to practice surveying vascular anatomy and gain familiarity with the IV apparatus. We use mental imagery, cued by the description of the technique and supported by explanations and pictures of what the learner should expect to see based on where the ultrasound beam is directed; this has been described in surgical literature and is associated with improved confidence and technical skill in some studies (26–31).
During the intraoperative teaching section, we support the learner as they perform what they just simulated and imagined. We use cueing to highlight the key steps, facilitating real-time deliberate practice by the trainee. This component of the training is a form of guided discovery, where an expert provides verbal and even hands-on guidance during the learning experience (32). The actual procedural performance is a live form of deliberate practice education, where the learner is attentively guided to focus on repetitively practicing very specific aspects of a skill or procedure; the educator provides rigorous assessment and real-time feedback to the trainee that informs their repeated tries under direct supervision. Namely, during this USPIV procedure, dynamic needle tip positioning (DNTP) is the key skill that the learner is made to concentrate on, hone, and repeat throughout the procedure to both successfully place the IV and demonstrate skill development as assessed by the supervisor (33).
In the debriefing portion, we focus on positive feedback to reinforce what was done correctly and encourage self-reflection to engage the learner on areas of improvement (34). Effective debriefing should result in the learner formulating objectives to guide future practice that can then be assessed during their next USPIV encounter. By allowing the learner to restate their main take-away lessons from the experience, we harness the learner’s metacognition and obtain a commitment for their further practice. The educator also uses this opportunity to reinforce the most salient learning objectives and to ensure the learner understands how to correct any errors made during the procedure.
What Is the Content?
Technique
Before the bedside
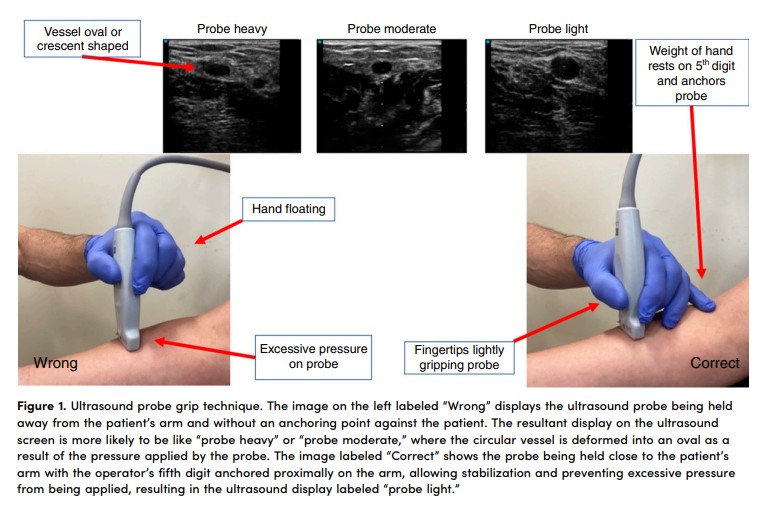
After gathering supplies (including extra IV catheters; see Figure E1 in the data supplement for suggested list), we orient the trainee to the ultrasound machine. This entails observing the trainee holding the linear array probe, ensuring they are anchoring their hand to assist with stabilization. With less-experienced trainees, or those who do not anchor their hand while holding the ultrasound probe, we find the “afternoon tea technique” to be an effective way to communicate how to lightly grip the probe while anchoring on the patient with their fifth digit (Figure 1) (35). We then have the trainee apply a tourniquet to the instructor’s upper arm and survey the vessels. Scanning the vessels on the instructor’s arm allows for reiteration of the ultrasound grip technique, confirms the trainee can identify relevant anatomy, helps the trainee practice orienting the probe perpendicular to the course of a vessel while performing serial compression, and allows the optimal gain and depth to be set on the machine.
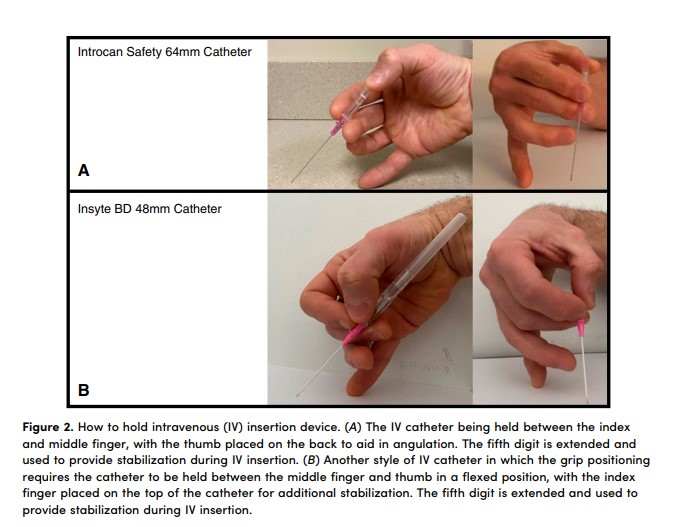
We then move to practicing holding the IV insertion apparatus. The specific technique requires adjustment based on available catheters. Our hospital currently carries the Introcan Safety 64 mm 18- and 20-gauge catheters, which allows the operator to hold the catheter between their index and middle finger, using their thumb to help control the angle of the needle (Figure 2). Insyte BD IV catheters (48 mm, 18 and 20 gauge) are another common style, requiring alternative hand positioning (Figure 2). Having an extra catheter in the supplies allows the trainee to practice holding and manipulating the catheter before going to the bedside.
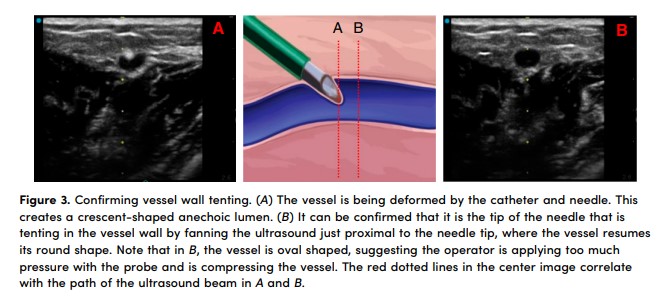
At this point, we review the concept of DNTP and highlight how to confirm proper needle position on the ultrasound display (11). We explain that DNTP is a short-axis technique in which the probe is moved just past the tip of the needle and then held in place while the needle is then inserted until it enters the plane of the ultrasound beam and appears on the screen as a hyperechoic dot. These movements are repeated to “walk” the needle tip down to the vessel. We reference Figure 3 to show the appearance of a crescent-shaped vein representing the anterior vessel wall being tented in by the needle and an “empty” anechoic vessel a few millimeters proximal to confirm the location of the tip of the needle.
The final step before transitioning to the bedside is a broad overview of the specific steps for placement, with more details provided at the bedside in real time or in the debrief after the procedure. We review the following script verbally:
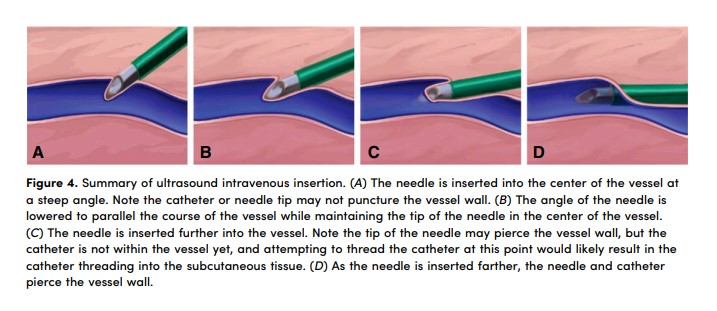
After vessel selection, the needle is inserted at the center of the ultrasound probe, nearly touching the edge, at a steep angle, and DNTP is used to guide the needle to the vessel. Once the needle is positioned in the center of the vessel, the angle of the needle is decreased to parallel the course of the vein, using the needle tip as the pivot point, and then DNTP is resumed until the needle is inserted entirely, or at a minimum, 2–3 cm.
We particularly stress that the operator should not be looking for a flash of blood as an indication the IV is in the vessel and that we will use the ultrasound to ensure the IV is properly placed. At this point, questions are answered, and we proceed to the bedside.
At the bedside
1. Vascular survey and target vessel selection
The learner applies the tourniquet and surveys the vessels and surrounding structures. We cue the operator to track the proposed target vessel with serial compression every centimeter to confirm there are no venous clots that may preclude successful cannulation. Ideal vessels for placement include those <1.6 cm below the skin, located medial or lateral to surrounding arteries and nerves, and >3 mm in diameter (36). Once a target is chosen, we have the operator clean the skin and the ultrasound probe.
2. Long IV insertion with steep approach and dynamic guidance
The operator first centers the vessel on the ultrasound screen and demonstrates with proximal and distal fanning that the probe is perpendicular to the course of the vessel. We then remind them to insert the needle at a 60- to 80-degree angle; if the vessel is <5 mm deep, we tell them to insert the IV at a 30- to 45-degree angle to avoid puncturing the vessel or injuring surrounding structures while passing through the skin. We are deliberate about giving feedback on the direction of gaze throughout this step: the operator’s eyes should be initially focused on the screen until the vessel is centered and the probe is stabilized, then eyes shift to the ultrasound probe to watch the needle pass through the skin, then eyes shift back to the ultrasound screen to find the needle tip. The operator then uses DNTP to follow the needle tip to the target vessel. As the supervisors, we provide active feedback throughout this process on the size of the movements made by the operator and ensure they do not inadvertently decrease the angle of the needle before reaching the vessel.
3. Tent in vessel wall and lower angle of needle to get parallel to the blood vessel
Once the target vessel is reached, we instruct the operator to insert the needle until it appears to be at the center of the vessel, decrease the angle using the needle tip as the pivot point to parallel the course of the vessel, and then continue inserting using DNTP (Figure 4). To confirm the needle is tenting in the vessel wall, we have the operator fan the ultrasound just proximal to where the tip of the needle is located and then back to the needle tip (Figure 3). This gives the supervisor confidence that the operator has the needle inserted at the intended depth.
4. Anterior wall puncture
It is critical for the operator to maintain insertion pressure on the needle while dynamically tracking to prevent the catheter from rebounding before it punctures the anterior wall of the vessel. The supervisor should take note of how much of the IV catheter has been inserted into the skin. If there is consistent observation of a similar length of exposed catheter, we instruct the operator to anchor the IV apparatus against the skin before each advancement of the ultrasound. As the IV is inserted, a tactile “pop” may be appreciated by the operator, often occurring between 1 and 2 cm after initial contact with the vessel wall (Figure 4).
5. Continue DNTP until IV is mostly or entirely inserted before attempting to thread catheter
We advocate tracking of the needle tip through the lumen of the vessel until the catheter is fully inserted, or the operator can ensure that there are at least 2–3 cm of catheter in the vessel. If the needle tip is inserted off-center, the operator is directed to ultrasound over the needle tip and slowly pivot the needle until the hyperechoic dot is in the center of the vessel before continuing dynamic tracking. Repeating this process throughout insertion allows the operator to gain appreciation for the magnitude of motion needed to reposition the needle. Once fully inserted, the ultrasound probe is placed aside, and the ultrasound hand is used to thread the remaining IV catheter into the blood vessel and to stabilize the catheter as the needle is removed.
6. Confirm placement using flush test
To confirm placement, in addition to imaging the catheter in short and long axis, we attach a saline flush, image proximal to the tip of the catheter, provide gentle compression to ensure the structure is venous, and then briskly flush 10 ml saline. The vessel will expand or become bright as the saline traverses the ultrasound beam, confirming venous placement (37–40).
Post-procedure debrief
Regardless of the success, we believe debriefing allows for technique reinforcement. Feedback post-procedure has consistently been demonstrated to improve effectiveness of learning (19, 34, 41, 42). We ask the operator what went well and what could be done differently next time, or areas for improvement, which helps gauge degree of insight to frame the subsequent discussion.
What Can be Challenging?
Here are two commonly experienced challenges encountered and how we approach ongoing skill development:
1. The learner is having trouble with DNTP
DNTP results in the needle alternating between being in and out of plane. There is a tendency for learners not to want to “lose” the tip of the needle and instead maintain the ultrasound beam on what they believe is the needle tip throughout the insertion process but in fact is the needle shaft. We remind operators that if they visualize the needle but advance it before repositioning the ultrasound probe, the true tip of the needle will lie beyond the path of the ultrasound beam. This concept is reinforced during the post-procedure debrief by holding up the probe and using a pen to act as the needle, making it clearer that the tip is being moved past the plane of the ultrasound beam.
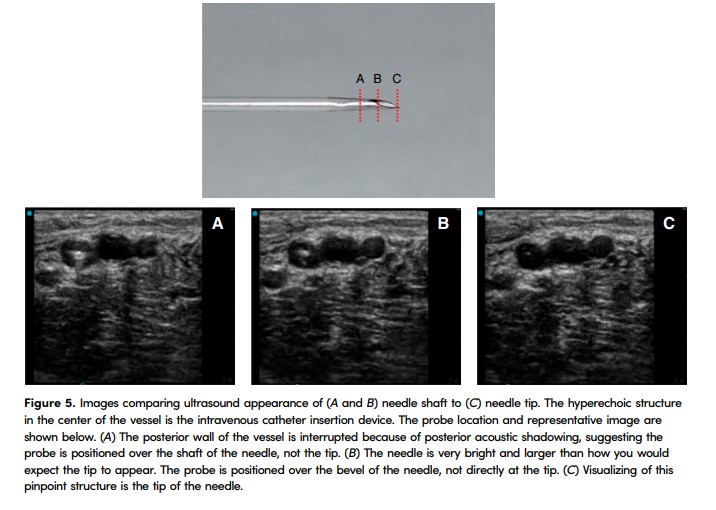
If the learner is moving the ultrasound too far with each movement, we will often hold the top of the ultrasound probe and deliberately fan the ultrasound while verbally calling out what is seen on the ultrasound screen. This allows the learner to gain an appreciation for the magnitude of each micromovement needed to move the needle tip in and out of plane without “taking over” the procedure. We review Figure 5 in the post-procedure debrief to reinforce that the tip of the needle is pinpoint in size and that micromovements should be used.
2. The learner expresses they are unable to see or find their needle
When the needle tip is within the subcutaneous tissue, it can be challenging to visualize the tip itself, because it is hyperechoic and may appear like surrounding tissue. To find the needle, we encourage the trainee to gently bounce the needle without advancing it and slowly slide the ultrasound probe from the point the needle enters the skin toward the tip of the needle until the tissue is no longer shifting, which is often just past the tip of the needle (Video E1). In our experience, unless the needle is passing through muscle, this maneuver is rarely painful. During this maneuver, the supervisor should point to the specific location on the ultrasound screen where they are seeing movement, allowing the trainee to begin to appreciate the subtle changes associated with needle movement.
During the insertion process there is a tendency for inexperienced learners to pick the probe entirely off the skin. We discourage this for two reasons: 1) when they pick the probe up, the tissue moves, which can alter the position of the needle relative to the target vessel; and 2) slow, deliberate sliding and fanning of the probe are necessary for mastery of DNTP. Thus, leaving the probe in contact with the skin allows the operator to gain more experience over the course of a single procedure attempt.
Below are a series of questions that are often asked by learners, with suggested answers and explanations.
The Patient Moves When I Try to Puncture Their Skin. How Can This Be Minimized?
We often use ice placed over the target vessel 1–2 minutes before sterile preparation or sterile ethyl chloride spray immediately before venipuncture to desensitize the superficial skin layer. Although counterintuitive to the heat typically applied to superficial veins to induce vasodilation, we find most deep vessels will not constrict significantly, and even in those that do the decrease in pain experienced results in less movement during insertion, although this has not been studied.
Why Not Just Use Pythagorean Theorem to Determine Where to Insert the Needle?
Although the Pythagorean theorem method has been described, we often observe errors in location of needle insertion (usually too far back from the center of the probe), resulting in the needle reaching the vessel before it crosses the ultrasound beam (43). In addition, the Pythagorean theorem relies on a 45-degree approach; we recommend taking a steeper approach to minimize catheter length in the subcutaneous tissue (44, 45).
Why Should I Not Use the “Flash” of Blood (Blood Visualized within the IV Apparatus) as an Indication I Can Thread the Catheter?
Blood within the IV often indicates the needle tip within the vessel but not the catheter itself, and attempting to thread the catheter off at this point often results in pushing the needle out of the vein, with catheter insertion into the surrounding subcutaneous tissue rather than the lumen of the vein (Figure 4). We find that learners have greater success when not observing for a flash.
Why Should I Continue to Advance the Catheter in the Vein after I Puncture the Anterior Wall?
Once the needle has punctured the anterior wall of the vessel, continuing to insert the needle into the vein helps in two ways: 1) When you remove the ultrasound probe from the skin, the subcutaneous tissue is no longer compressed and can result in the needle dislodging from the vessel as it shifts back to its resting position. The farther the needle is inserted into the vein beyond the puncture point, the more it is “speared” and held in place when the probe is removed. 2) The farther the needle is inserted in the vein, the less likely it is to slide out of the vessel if the needle is inadvertently, even minimally, retracted before the IV is threaded all the way in. The needle tip is being followed within the lumen of the vessel, so it is usually not uncomfortable for patients while advancing farther. In addition to the described benefits, it allows more deliberate practice with DNTP during a single procedure attempt.
How Many USPIVs Will I Need to Place before I Am Competent?
The available literature, which focuses mostly on nurses and emergency medical services personnel, suggests four attempts for a success rate of 70% and 15–26 attempts for success rate of 88% (13).