
These notes concern use of the laryngeal mask airway in neonatal resuscitation.
What follows are more notes from the 2011 Textbook of Neonatal Resuscitation:*
When might a laryngeal mask airway be useful?
“When you ‘can’t ventilate and can’t intubate,’ the device may provide a successful rescue airway.”* (p 191)
“. . . , a laryngeal mask be helpful when a newborn presents with the following:”* (p 191)
- Congenital anomalies involving the mouth, lip, or palate, where achieving a good seal with a mask is difficult.
- Anomalies of the mouth, tongue, pharynx, or neck that results in difficulty visualizing the larynx with a laryngoscope.
- A very small mandible or relatively large tongue, such as with Robin syndrome and Trisomy 21.
- Positive-pressure ventilation provided by bag and mask or T-piece resuscitator is ineffective, and attempts at intubation are not feasible or are unsuccessful.
“Laryngeal masks cannot be used in very small newborns. The smallest currently available laryngeal mask airway devices are intended for use in babies greater than approximately 2 kg. However, some providers have used the size-1 larygeal masks successfully in babies as small as 1,500 g.”* (p 192)
Placing the Laryngeal Mask Airway* ( pp 192 – 194)
“The following instructions apply to the disposable device.’
“Note: If you think that the stomach is distended in a baby in whom you have decided to place a laryngeal mask airway, an orogastric tube should be placed, and air in the stomach aspirated, before inserting the laryngeal mask airway. The orogastric tube should be removed before laryngeal mask airway placement, as its presence may prevent you from obtaining a proper seal with the laryngeal mask airway.
Prepare the laryngeal mask airway.
1. Wear gloves and follow standard precautions.
2. Remove the Size-1 device from the sterile package and use clean technique.
3. Quickly inspect the device to ensure that the mask, midline aperture bars, airway tube, 15-mm connector, and pilot balloon are intact.
4. Attach the included syringe to the pilot balloon valve port and test the cuff by inflating it with 4 mL of air. Using the attached syringe, remove the air from the cuff.
5. Check to be sure that the cuff is deflated before insertion. Some clinicians believe that leaving a small amount of air in the cuff (enough to remove the wrinkles) makes insertion easier. However, this has not been systematically evaluated.
Get ready to insert the laryngeal mask airway.
6. Stand at the baby’s head and position the head in the “sniffing” position as you would for endotracheal entubation.
7. Hold the device like a pen in either hand, with your index finger placed at the junction of the cuff and the tube (Figure 5.39). The bars in the middle of the mask opening must be facing forward, toward the baby’s tongue. The flat part of the mask has no bars or openings, and it will be facing the baby’s palate.

8. Some clinicians lubricate the back of the laryngeal mask with a water-soluble lubricant. If you chose to do so, be careful to keep the lubricant away from the apertures on the front side, inside the mask.
Insert the laryngeal mask airway.
9. Gently open the baby’s mouth and press the cuff end of the device, with the open side of the cuff facing anterior, against the baby’s hard palate (Figure 5.40A).
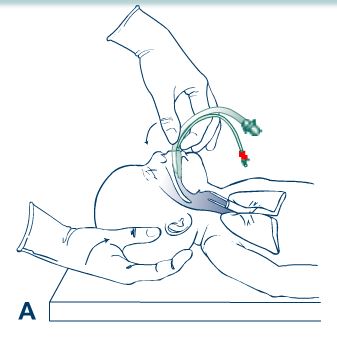
10. Flatten the back side of the mask against the baby’s palate with your index finger just above the cuff. Ensure that the tip of themask remains flat and does not curl backward on itself.
11. Using your index finger, gently guide the device along the contours of the baby’s hard palate toward the back of the throat (Figure 5.40B). Do not use force. Use a smooth movement to guide mask past the tongue and into the hypopharynx until you feel resistance.
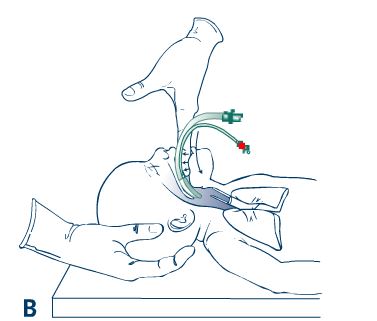
Set and secure the laryngeal mask airway in place.
12. Before removing your finger, grasp the airway tube with your other hand to hold it in place (Figure 5.40C). This prevents the device from being pulled out of position while you are moving your finger. At this point, the tip of the mask should be resting near the entrance to the esophagus (upper esophageal sphincter).
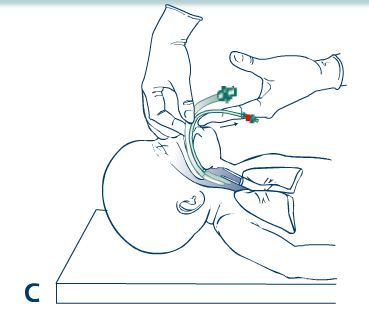
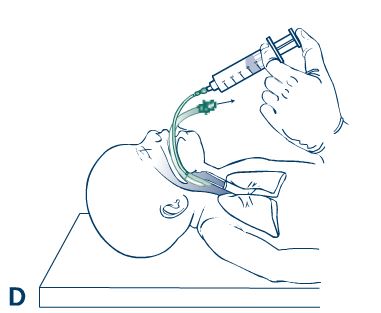
13. Inflate the cuff by injecting 2 to 4 mL of air via the inflation valve (Figure 5.40D). The cuff should be inflated with only enough air to achieve a seal. Do not hold the airway tube when you inflate the mask. You may note that the device moves slightly outward when it is inflated. This is normal. Never inflate the cough of the size-1 laryngeal mask airway with more than 4 mL of air.
Ventilate through the laryngeal mask airway.
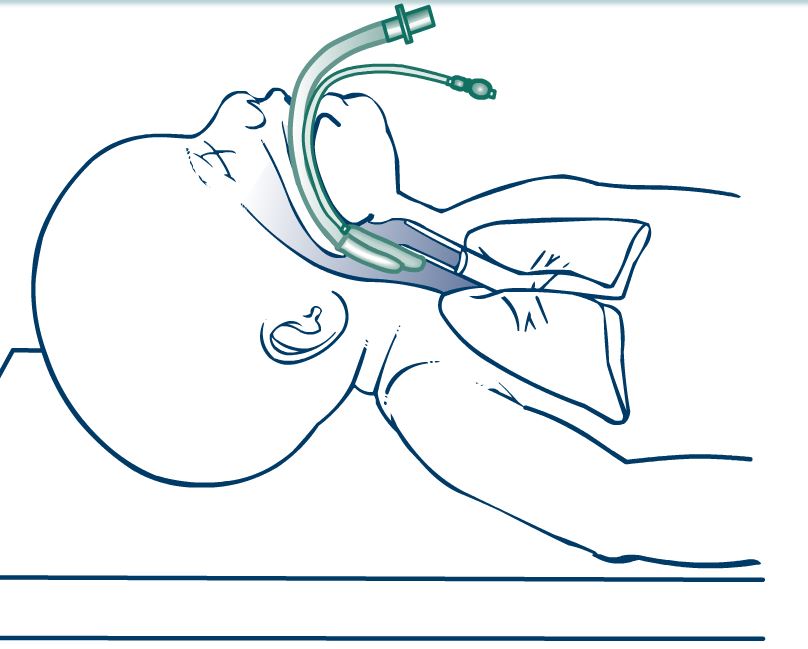
14. Attach your resuscitation bag or T-piece resuscitator to the 15 mm adaptor on the device and begin PPV (Figure 5.41)
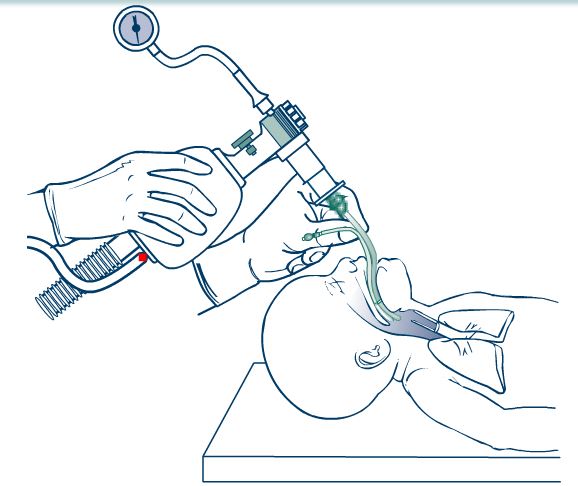
15. Confirm proper placement by the presence of rising heart rate, chest wall movement, and breath sounds audible with a stethoscope.
16. Secure the tube with tape, as you would an endotracheal tube.
“How do you know that the laryngeal mask airway is properly placed?” (p 195)
“If the device is properly placed, you should notice a prompt increase in the baby’s heart rate, equal breath sounds when you listen with a stethoscope, increasing SPO2, and chest wall movement, similar to what you would expect with a properly placed endotracheal tube. If you place a colorimetric CO2 monitor on the adaptor, should note a rapid color change indicating expired CO2. It is possible for the baby to breathe spontaneously through the laryngeal mask airway: therefore, you may hear grunting or crying through the device. You should not hear a large leak of air coming from the baby’s mouth or see a growing bulge in baby’s neck.” (p 195)
Resources:
*Textbook of Neonatal Resuscitation, 6th ed. 20ll, American Academy of Pediatrics and American Heart Association.


