
Here is the resource I’ve added today along with excerpts:
- Novel approaches to ultrasonography of the lung and pleural space: where are we now? [PubMed Abstract] [Full Text HTML] [Full Text PDF]. By Daniel Lichtenstein.* Breathe (Sheff). 2017 Jun;13(2):100-111.
I’ve divided Dr. Lichtenstein’s article, for my notes, into two parts.
This post, is the first part of Dr. Lichtenstein’s article. This part of his article covers the basics of lung ultrasound.
The next post covers the second half of the doctor’s article and cover the clinical applications of lung ultrasound.
Dr. Lichtenstein’s article is simply outstanding. It is the best clearest introduction and review of lung ultrasound that I’ve found.
His article is the resource that all beginners should start with, I think. For instructors of this technique it will help you clarify the important points that beginners often fail to realize.
And for experienced lung sonographers, it is an awesome resource. It reinforces the critical details that are required to get the most out of lung ultrasound scanning.
Here are excerpts from Dr. Lichtenstein’s article:
The tools for practicing LUCI (Lung Ultrasound In The Critically Ill)
The development of the tools for LUCI is the main change in the field in recent years. Previously, we had been using a 1982 technology (the ADR-4000) to develop, since 1989 (after underground years from 1984), critical care ultrasound, including of the lung. We still use everyday a 1992 Japanese
technology (the latest update, being purely cosmetic, in 2008).CEURF* has defined seven criteria that an ultrasound machine must meet for you to be able to face the worst (i.e. cardiac arrest). Fortunately, the same equipment and approach are also perfect for other applications, from inserting a central venous
line to checking bladder emptying, etc.). Although a given ultrasound machine may not necessarily meet all of our criteria, the more criteria your equipment does meet, the better prepared you will be for the greatest range of applications.
*This link is to the home page of CEURF (The Circle of Emergency and Resuscitation Echographists Francophones) which contains links to many outstanding ultrasound resources. Both beginners and experienced ultrasound clinicians should explore this site.
And here are links to Dr. Lichtenstein’s YouTube videos:
- Whole Body Ultrasound Centered on the Lung A Holistic Approach by Dr Daniel Lichtenstein. 20:28, Jan 20, 2019.
- 2015 Lung The Blue Protocol and Advanced issues By D. Daniel Lichtenstein. 55:09, Apr 27, 2019.
- 2015 Lung and diaphragm ultrasound Dr Daniel Lichtenstein. 31.00, Apr 27, 2019.
- Snack DL-08: What is for Dr. Daniel Lichtenstein the best ultrasound machine for ICU purposes. 3:12, Aug 18, 2014.
HandsOnEcho has a number of useful downloadable resources on ultrasound applicable to:
- Nephrology
- General Practice
- Physical/Sports Medicine
- Kinesitherapy
- Critical Care Medicine
- Gastroenterology
- Cardiology
- Gynecology
The tools for practicing LUCI (Lung Ultrasound In The Critically Ill) [Continued from above]
- The machine must be small (for rapidly accessing the patient at the bedside). In hospitals, the obstacles are lateral, which means that a laptop is of use only if its lateral dimensions (cart included) are small (smaller
than our 1992 reference of 32 cm wide). We ask the user to consider that they have never seen their laptops outside the cart. The cart, in addition, allows one to keep the machine clean (see later), to work with two hands (we are unable to perform critical ultrasound with only one hand), to have all of the equipment
on site (interventional equipment, etc.) and to work at an ergonomic height. The cart is really a mandatory adjunct. Only few professions will take advantage of handheld machines (e.g. those working, like us, in medical aeroplanes).- ) The image must meet a minimal quality standard. Ultrasound is a nice example of vicious circle: when digital technologies came, this was a spectacular step backward in image quality. Now, they are little by little reaching the quality of the older analogue technologies.
Hence, the need for compound and harmonics, which (see later) have sacrificed the lung to the advantage of less critical organs.- The machine must have a fast start-up time.
Long delays must be avoided in cases of cardiac
arrest. It helps if the machine is used many
times a day. Ours has a 7-s start-up time, which
is the fastest machine in the market. [Emphasis added as this is the most important attribute in office practice as well.]- A universal probe is needed. Fortunately, the Japanese microconvex probe we has use since 1992 has quite perfect resolution (see figures), range (from 0.6 to 17 cm, i.e. a whole-body approach) and length (8 cm, giving the possibility to scan posterior areas in supine, ventilated patients).
- A simple device is needed. While most clinicians do not have the skill of traditional experts (radiologists, cardiologists, etc.), in the event of a cardiac arrest, the comfort afforded by this skill is of no value. In our day-to-day practise, we use only three buttons (B mode/M mode, depth and gain). For cardiac arrest, we use no
buttons at all (see later). We have never used Doppler ultrasonography in the past 28 years, including in other areas (venous assessment, etc.). The filters and facilities (dynamic noise, average, compound and harmonics), which are not bad for obtaining beautiful images of plain organs, can hinder LUCI: precious artefacts are erased and real-time imaging is affected by the informatic systems that rebuild the image, resulting in a confusing delay- The unit must be compact, for efficient cleaning. Our 1982 and 1992 technologies have a flat keyboard. We developed a simple, fast and efficient cleaning protocol, detailed in all our textbooks [5].
- The machine must be affordable. Criteria 4 and 5 make this possible. Our machine cost €15000 in 1992.
We find many modern machines often make performing lung ultrasound a bit difficult, despite being accustomed to using them in many workshops.
We advise carefully deleting useless and deleterious filters, and bypassing all of them.
I advise using the abdominal probe first, acknowledging also
that it can rapidly becoming limiting (in posterior areas, in areas of difficult access, due to the need for a superficial resolution, etc.).However, we are glad to see that, increasingly since very recently, some manufacturers have begun to build machines
with real simplicity. “Intelligent” machines are little by little elegantly competing with these laptops full of buttons and dust (and microbes), with endless start-up times, large widths, opaque algorithms, high cost, etc.The seven principles of LUCI
The seven principles of LUCI have not changed since
2001 [6], apart from a slight update to principle 7
- A simple technique is still suitable.
- The thorax is an area where air and water (gas and fluids for purists) can mingle. They follow the rules of gravity. One can define a macro-gas/fluid ratio (e.g. pleural effusion and aerated lung) and a micro-gas/fluid ratio, for defining the situation where in a minute place, the two elements coexist (e.g. an oedematous subpleural interlobular septum surrounded by air).
- The lung is the widest organ; areas of interest must be defined (the BLUE points).
- All signatures arise from the pleural line.
- Artefacts, although usually considered a hindrance, have critical relevance in lung ultrasound.
- The lung is the most vital organ. Like all vital organs, it is dynamic. The main dynamic is referred to as lung sliding.
- All life-threatening disorders abut the chest wall. Update: and almost all, even small ones, have an extensive location (e.g. a pneumothorax can be small but visible in a rather large projection).
The technical approach to a critically ill patient
We must first define the areas of investigation. Those we use in an emergency comprise three strictly defined points, although LUCI principle 7 allows a certain flexibility. These BLUE points are defined by applying one’s hands to the patient’s thorax, in
order to make finding the ultrasonographic field easier (figure 1).

In critical settings, movement comes from the lung, the chest wall (severe dyspnoea) and the whole body of critically ill, anxious patients. The physician should not add their own movement and should hold the probe gently but firmly in order to be able to understand the dynamics of lung ultrasound. Severe dyspnoea generates contractions of the accessory
muscles, in which case, some expertise is required, although the procedure is made easier by using a standardised analysis, mostly using the M-mode (describing Keye’s sign; the Avicenne sign would be too long in the given volume).The main signatures seen in the critically ill
Considering the way LUCI is sometimes described and taught, we will take the opportunity here to remind you of the definitions of the disorders. Our training centre aims to explain our choice (of equipment, probe and signatures) with the result
of demonstrating that all confusion, which is still frequent in this field, can be avoided because LUCI as taught by CEURF is completely standardised.There is no room for confusion in LUCI. Often, lectures
on lung ultrasound deal with pleural effusion, lung consolidation, and more rarely, interstitial syndrome and pneumothorax, but the normal pattern is rarely described. A brief description of the normal lung surface is critical, since it is seen in various diseases.Normal lung surface
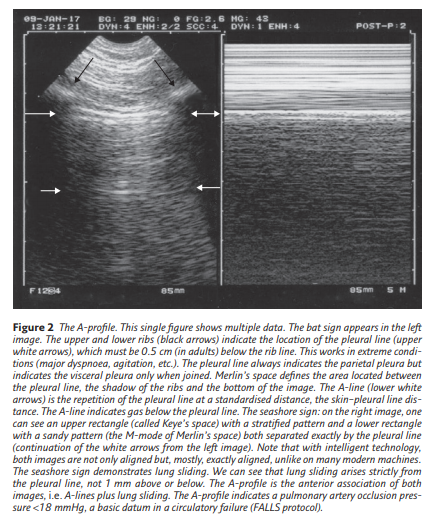
Merlin’s space is defined in a longitudinal scan as the surface delimited by the pleural line, the shadow of the ribs and the bottom of the screen. Lung sliding is strictly defined as a homogeneous twinkling (shimmering, sparkling or glittering) of
Merlin’s space. This definition indicates that lung sliding must begin at the pleural line. The A-line is a repetition of the pleural line in the Merlin’s space. At the anterior chest wall in a supine or semirecumbent patient, lung sliding with A-lines strictly defines the A-profile. The A-profile is a practical term for sharing maximal information in minimal time. See figure 2 for more details.
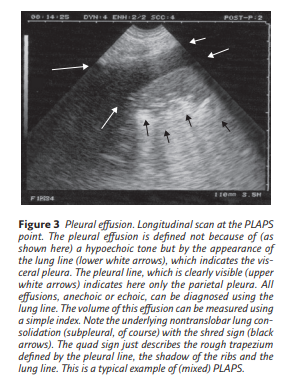
Pleural effusion
Pleural effusion is clearly defined using the concept of the lung line, a regular line roughly parallel to the pleural line. At CEURF, no tone (hypo- or hyperechoic) is needed, which is an advantage because then only anechoic effusions appear
anechoic (if the pleural effusion was defined as an anechoic collection, the most life-threatening cases would not be diagnosed) (figure 3).
Lung consolidation
The shred sign (or fractal sign) is of value for immediately diagnosing nontranslobar cases of lung consolidation, which are the most frequent (figure 4).
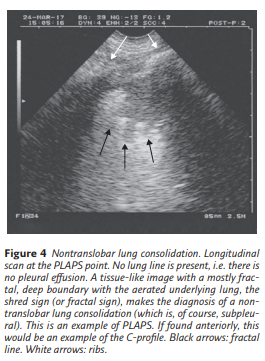
The term “subpleural” is useless in the world of LUCI: each time a consolidation is seen using ultrasound, whether it is minute or huge, it is subpleural. We would guess that those who use this term mean “small” consolidations, so we would advise the term “small” be used instead of “subpleural”. In translobar cases, no shred sign can be seen and the image observed is a whole anatomical lung with a tissue-like pattern that one may call, temporarily, the lung sign (figure 5).

Atelectasis is a notion that generates some confusion. To begin with, many authors oppose atelectasis to consolidation: atelectasis is a (retractile) consolidation. Authors describe passive atelectasis, due to pleural effusion (and we ask, so where does the effusion come from?). The only worthwhile atelectasis is the obstructive form. Complete obstructive atelectasis (e.g. foreign body aspiration) generates immediate functional
signs (abolition of lung sliding with, usually, lung pulse) and delayed morphological signs: usually no air bronchogram but if any, never dynamic ones; and loss of lung volume with attraction of the surrounding organs.Posterolateral alveolar and/or pleural syndrome (PLAPS) [And The PLAPS Point*]
*The PLAPS Point is
The notion of posterolateral alveolar and/or pleural syndrome (PLAPS) has great relevance in the BLUE protocol. At the PLAPS point, the detection of an alveolar, pleural, mixed or even ill-defined but otherwise structural image is called a PLAPS
(figures 3–5). This can simplify the use of LUCI,
especially in difficult (bariatric) patients, since the
distinction does not impact the accuracy of the BLUE
protocol (subtle distinctions should be made once
the BLUE protocol is perfectly mastered, not before).Using the PLAPS point, very posterior disorders can be detected, which is better, of course, than with lateral views that are sometimes advised. Note that abdominal probes have a limited ergonomy, and the cardiac probes a limited resolution for the analysis of PLAPS in supine patients.
Here I repeat figures 3 through 5 from earlier in the article for ease of review.
Using the PLAPS point, very posterior disorders can be detected, which is better, of course, than with lateral views that are sometimes advised. Note that abdominal probes have a limited ergonomy, and the cardiac probes a limited resolution for the analysis of PLAPS in supine patients.
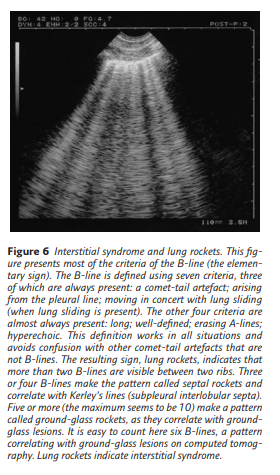
Interstitial syndrome
Interstitial syndrome is clearly defined when more than two B-lines are visible between two ribs. We propose a hierarchy of signs that allows universal definition (figure 6). Using this standardised definition, comet-tail artefacts such as the E-line
(seen in the case of parietal emphysema) or Z-line (interference) will not be confused with B-lines. We would like to add that the expression “more than three B-lines” makes no sense for diagnosis.
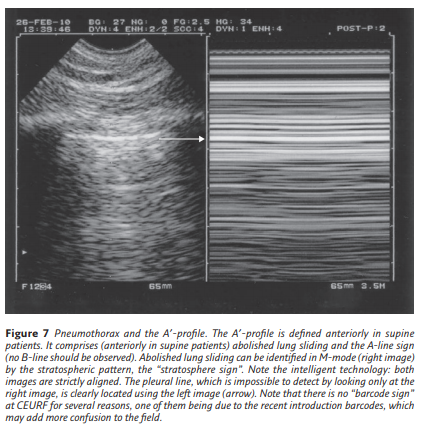
Pneumothorax
Little has changed in the ultrasonographic diagnosis of pneumothorax. Pneumothorax is still defined by a sequential approach, first recognising the A′-profile (which is anterior, by definition). This A′-profile is constant (figure 7).
Second, finding a lung point, i.e. extending from the area with the A′-profile laterally until this point is found. The lung point is defined as follows: once, and only once, an A′-profile has been detected, the probe is moved until one finds the sudden appearance of lung signs (lung sliding and B-lines), synchronous with respiration (figure 8)


