
Everything you need to know to prepare the perfect printfile For Printful
By Julia Gifford on April 7th, 2016 – Reading time: 5 minutes
Basics of graphics
To get started, here are some general rules of thumb to keep in mind when thinking about printfiles:
Max. printing area: 12×16 inches, with exceptions (see below).
DPI: Files have to be a minimum of 150 dpi (digital pixels per inch). If the dpi is higher, we can expand the image. Any lower and the image will be put on hold.
Best format for submitting files: .png
Worst format for submitting files: Adobe Illustrator files
File & image size is the top offender
One of the most common issues is with the size of either the file itself or the image you’re printing.
File size – the guidelines are key!
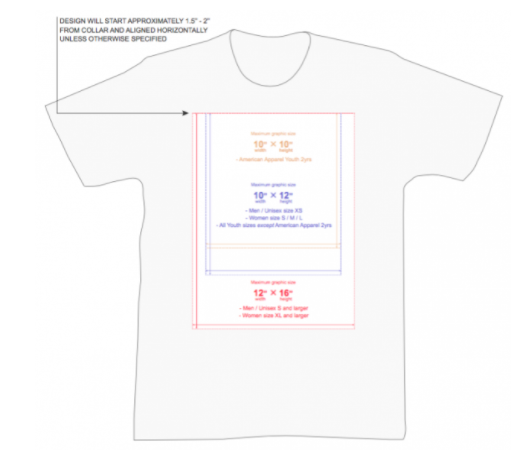
Our graphics department says that 80% of hold issues could be solved if the printfile guidelines were followed. Why? Because there are exceptions to standard printing sizes for different models, cuts, and sizes of shirts. Here are some of the main transgressions in regard to file size exceptions:
The standard printing area men’s or unisex t-shirts is 12×16”, except for men’s XS, which is 10×12”.
The standard printing area for women’s t-shirts is 10×12”, except for women’s XL and larger, which is 12×16”.
Image quality and size
One of the most common issues is submitting a low-quality image, or an image that is too small to be qualitatively scaled up.
It might look fine on your screen when it’s only a few inches wide. However when the image is printed out on a real life t-shirt, the image also turns out to only be a few inches wide, meaning that it looks tiny in comparison to the life-sized t-shirt. Make sure the image you’re submitting is actual size, and that it reflects how big you actually want it on your garment.
If we do print out the unqualitative image, then it will be blurred, stretched and the edges will be pixelated. Generally not what high-quality online stores should be aiming for. All images should be submitted in no less than 150 dpi, however if your image has fine details, we suggest submitting the image at 300 dpi. So that in the case that you’re printing on dark garments, the white underbase won’t be visible.
However, keep in mind that even 300dpi does not guarantee a quality print, especially if the artwork is being printed on a dark garment – some of the white under-base may still be showing.
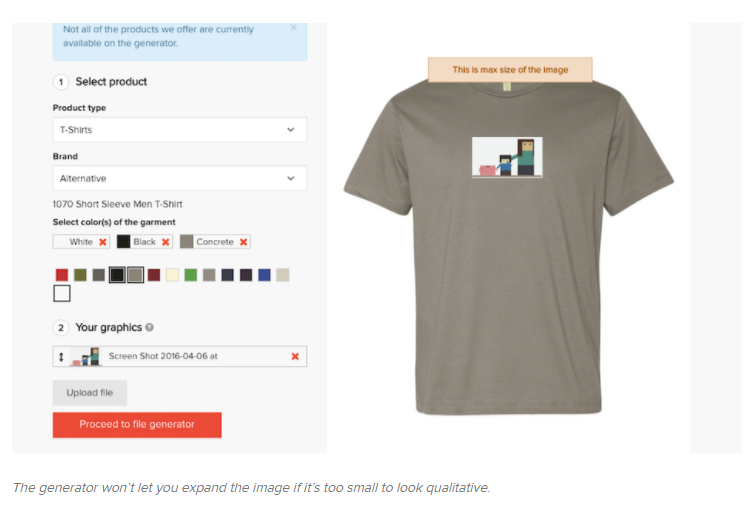
Tip: To quickly find out if your image is large enough to be printed in a good quality, upload it to the mockup generator and see if you can scale it to the desired size.
Insufficient information leads to mistakes
Sometimes ambiguous orders come through. For example a design comes in at 6×6 inches (looks pretty small on a t-shirt), but in a high quality resolution (300 dpi). We don’t know if it should be printed in the 6×6 size, or if it should be expanded to full size (12” in width).
Note: with the resolution of 300dpi we can generally double the size of your image – this means it will be printed at 150dpi. However, if you want to keep the resolution at 300dpi, we suggest adjusting the actual file size. Communication is key – make sure to add mockup images and/or printing notes to get what you had intended.
File formatting for most accurate printing
We suggest submitting your printfiles in .png or .jpg. You should avoid PDF files, Illustrator files, and vector files as they don’t always convert properly (they end up printing hidden layers, or there can be missing fonts).
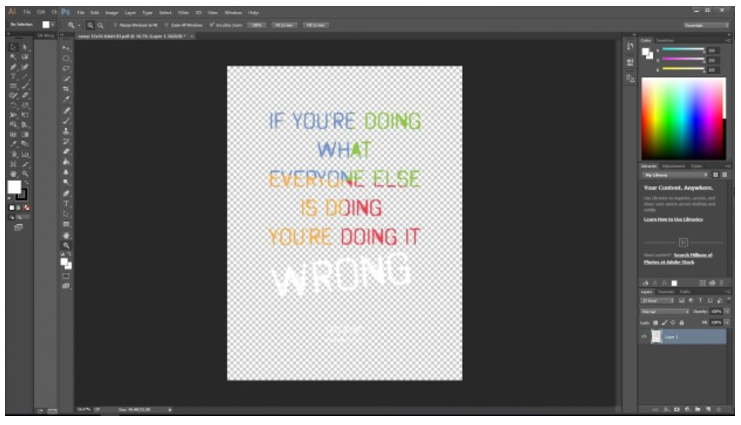
When going for a “glow” effect, don’t use the transparency function (aka lower the opacity) in photoshop. When it’s printed out, it will look like a bunch of polka dots due to the white underbase that’s applied underneath. On lighter garments, prints will come out a lot more concentrated that you might have intended since printers don’t always recognize transparencies and will print them as solid colors.
To avoid this result, use half-toning to achieve the same “glow” effect.
Removing background images
Always remove the backgrounds. Even if you’re printing on a white garment and you think it’ll be fine if you leave the white background – don’t. Although your graphic is being printed on a white garment, the white background may actually cause the print to appear slightly muddy and blurry.


