For my latest ecommerce site, I decided to use the Woocommerce theme, Storefront. I purchased a bundle of 15 Woocommerce plugins to enhance the functionality of my store.
And these plugins had to be installed manually. So this post details how I did it.
The following is from WordPress Codex Managing Plugins:
Manual Plugin Installation
There are a few cases when manually installing a WordPress Plugin is appropriate.
- If you wish to control the placement and the process of installing a WordPress Plugin.
- If your server does not permit automatic installation of a WordPress Plugin.
- The WordPress Plugin is not in the WordPress Plugins Directory.
Installation of a WordPress Plugin manually requires FTP familiarity and the awareness that you may put your site at risk if you install a WordPress Plugin incompatible with the current version or from an unreliable source.
Backup your site completely before proceeding.
To install a WordPress Plugin manually:
- Download your WordPress Plugin to your desktop.
- If downloaded as a zip archive, extract the Plugin folder to your desktop.
- Read through the “readme” file thoroughly to ensure you follow the installation instructions.
- With your FTP program, upload the Plugin folder to the wp-content/plugins folder in your WordPress directory online.
- Go to Plugins screen and find the newly uploaded Plugin in the list.
- Click Activate to activate it.
Check the Details readme file for customization and further instructions.
For details on using Filezilla, see the WordPress Codex, Using Filezilla. The following is from this resource:
[Filezilla is] fast, stable, easy to use, and free. FTP is a standard way to upload or download files between your local system and your web server, and FileZilla is a solid client for everyday FTP needs.
[Setting Up Filezilla]
You will need the following details regarding the FTP account on your server:
Your website ftp address (usually ftp://example.com if your URL is https://example.com)
Your ftp username
Your ftp password
If you do not already have an FTP account on your server, use your cPanel or website administration tool to set one up — it will have all the information needed. If in doubt, ask your host for directions or help regarding an FTP account for your use to access your webspace.Before connecting the FTP server, you should register it in the Site Manager. Once you register it, you just one click to connect the same server. To register the FTP server, follow below steps:
- Click File > Site Manager from FileZilla main window.
- Click New Site then name the new connection to what you want (example: My blog server).
- Enter the ftp address for your website in Host box. Usually, if your website is https://www.example.com, then the ftp address will be ftp://ftp.example.com or ftp://example.com. Note: Do not put a / at the end unless specifically told to do so on your cPanel or by your host.
- Leave the Port box blank. Default value 21 should be used. Only change these if your FTP account details explicitly indicate that you should.
- Select Normal from Logon Type box
- Enter the full username that you have been given in User box. It may be just a username, or it may look like an email address (but it isn’t one). For instance, it would look similar to user or user@example.com.
- Enter password. Remember that the password might be case sensitive.
- Click OK.
Connecting
In the Toolbar of FileZilla main window, Select the down arrow of most left icon “Open the Site Manager”, and select your FTP server from drop down list. Or, start Site Manager from File > Site Manager, select your FTP server and click ‘Connect’.
If all is well, then in the top window of FileZilla, you will have seen a series of messages, and in the large window, you will see a listing of the files will appear.
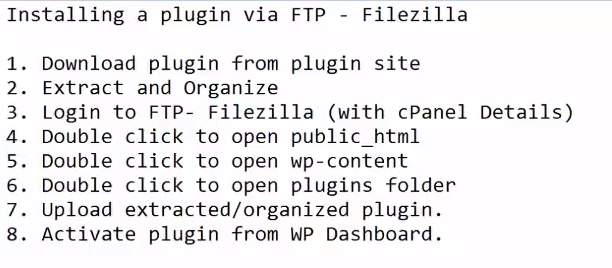
Here are some screen shots from the YouTube video Installing a WordPress Plugin via FTP Filezilla by Grooming Desk Published on Feb 5, 2016: