
In this post I link to and excerpt from the SPRINT [Link is to the main website] Manual of Procedures that relate to blood pressure measurement of 12/19/2014.
Here are excerpts:
The excerpt from the SPRINT Manual of Procedures (MOP) below, dated November 1, 2010, includes instructions about blood pressure measurement. Recruitment for the SPRINT trial began on November 8, 2010; therefore, this version of the MOP was in place prior to the start of recruitment.The MOP was updated throughout the course of the trial; however, this section remained the same throughout the duration of the trial with the exception of correcting the BP cuff sizes (MOP version
12/03/2010) and adding section 3.2.3.1 (Repeating Automated Measurements (MOP version 12/19/2014). The November 1, 2010 excerpt and the updated excerpt from the current version of the MOP (dated December 19, 2014) are included within this document.3.1.3 Weight – See p 2 of PDF.
3.1.4 Physical Exam – See p 2 of PDF.
3.2 Blood Pressure/Pulse – pp 2 – 6 of PDF
3.2.1 Background and Rationale
Standardized and accurate measurement of blood pressure is critical to the conduct of SPRINT. A standard automated blood pressure measurement device (the OMRON HEM-907 XL Professional Digital Blood Pressure Monitor) and a specific protocol for the measurement of blood pressure and pulse will be utilized.
3.2.2 Frequency and Timing
Seated blood pressure and pulse are measured three times at each clinic visit. The average of these three measurements will constitute the visit blood pressure and pulse. A single standing blood pressure and pulse measurement will be made after the
seated blood pressure measurements at the following visits: screening, baseline, 1 month, 6 months, 12 months, and annually thereafter. Blood pressure measurement must be conducted early in the visit and not following potentially stressful exam components such as the blood drawing or self administered questionnaires.3.2.3 Methods
This protocol is written for use with the OMRON HEM-907 XL Professional Digital Blood Pressure Monitor. Special attention must be placed on assessment and maintenance of the instrument’s accuracy as per the manual that accompanies the
instrument. The design and operation of the OMRON HEM-907 XL Professional Digital Blood Pressure Monitor are based upon the combined principles of compression of the brachial artery under an elastic, inflatable cuff and estimation of the systolic and diastolic blood pressure levels by oscillometric methods. The observer places the correct size cuff on the participant’s arm, pushes the button on the device and waits for the output. All readings will be recorded to the nearest digit.Required Equipment
- OMRON HEM-907 XL Professional Digital Blood Pressure Monitor.
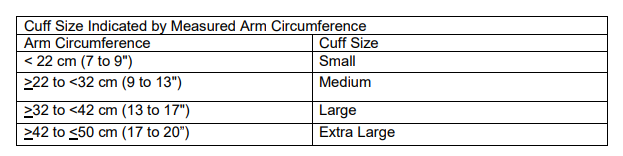
- BP cuff/bladder sets in four sizes:
- Small: < 22 cm (7 to 9″)
- Medium: >22 to <32 cm (9 to 13″)
- Large: >32 to <42 cm (13 to 17″)
- Extra Large: >42 to <50 cm (17 to 20”)
- Metric tape
- Black pen
- Preferably, chair with arm support for blood pressure measurement, or chair and table. Table must provide for a comfortable resting posture of the arm with midcuff at heart level. Chair must have a back for participant’s back to be supported during rest and BP determinations.
- Data collection form
Cuff Size Determination
Proper cuff size must be used to avoid under- or over-estimation of blood pressure. Cuff size refers to the cuff’s bladder, not the cloth.
- BP measurements should usually be taken in the right arm. The left arm may be used if the BP is known to be higher in that arm or in the presence of an anomaly or
other circumstance prohibiting use of the right arm.- Have the participant remove his/her upper garment (bare arm).
- Have the participant stand, holding forearm horizontal (parallel) to the floor.
- Measure arm length from the acromion (bony protuberance at the shoulder) to the olecranon (tip of the elbow), using a metric tape
- Have participant relax arm along side of the body.
- Draw the tape snugly around the arm at the midpoint mark. NOTE: Keep the tape horizontal. Tape should not indent the skin.
- Use the criteria in the table below for determining cuff size. A copy of the table should be attached to the sphygmomanometer for easy reference.
- Cuff size as determined at screening will be pre-printed on all subsequent blood pressure forms. Unless significant weight loss or gain has occurred between visits, it is preferable to use the same cuff size throughout the study.
If the participant’s arm circumference is > 50 cm, the OMRON will not be used for BP and pulse measurements. In these participants, a manual (preferably mercury) manometer will need to be used with an extra large or thigh sized cuff.
Programming the OMRON HEM-907 XL Professional Digital Blood Pressure Monitor
The BP monitor should be programmed to allow a 5 minute rest before the first BP measurement, to take 3 readings at 1 minute intervals, and to display the average. See specific instructions provided by OMRON at the end of this chapter.
Wrapping the Blood Pressure Cuff Around the Arm
The participant should be seated with back supported, legs uncrossed, in a quiet room, with the elbow and forearm of the right arm resting comfortably on the armrest of the blood pressure measurement chair (or the table) with the palm of the hand turned upward. If unable to take the BP using the right arm, please note in the source documentation. The area to which the cuff is to be applied must be bare.
Locate the brachial artery by palpation and mark the skin with a little dot. (The brachial artery is usually found at the crease of the arm, under the muscle and slightly towards
the body).Place the appropriate cuff around the upper right arm so that:
a) The midpoint of the length of the bladder lies over the brachial artery, and
b) The mid-height of the cuff is at heart level.NOTE: Confirm for yourself where the midpoint of the length of the bladder is by folding the bladder in two. Do not trust the marking on the cuff.
Place the lower edge of the cuff, with its tubing connections, ½ to 1 inch above the natural crease across the inner aspect of the elbow.
Wrap the cuff snugly about the arm, with the palm of the participant’s hand turned upward. Make sure that the long edges of the cuff lie on top of each other as you wrap the cuff around.
Secure the wrapped cuff firmly by applying pressure to the locking fabric fastener over the area where it is applied to the cuff.
Do not wrap the cuff too tightly around the arm, but so that you can insert only one finger between the cuff and arm.
Taking the Seated Blood Pressure and Pulse Measurements
The participant should sit quietly for a period of 5 minutes before the first blood pressure is taken. He or she should be seated comfortably, feet flat on the floor with their back supported. Ideally, he or she should not have smoked or had any caffeine within the last 30 minutes prior to the BP determinations.
SCRIPT: “I would like you to rest for 5 minutes before I begin taking your blood pressure. I will leave the room. When I return, I will not speak to you but will immediately begin to take your blood pressures. Do you understand?” With their agreement, leave the room and return in 5 minutes.
Push the button on the machine and wait for the output. Record the systolic and diastolic blood pressure and pulse readings obtained at each of the three readings and the average of the three readings in the spaces provided on the appropriate form. [Note: only the averages will be data entered].
Standing Blood Pressure and Pulse Measurements
After the seated BP and pulse measurements have been obtained and recorded, ask the participant to stand. Time for one minute with a watch or stopwatch; you may also use the Omron itself (it can be used as a timer) to take the standing BP. If using the
Omron, once his (her) feet touch the ground, press the start button on the Omron device to initiate a new BP and pulse measurement.After 60 seconds, turn the mode selector to “single” and press the start button on the Omron again to take one standing BP and pulse measurement. Immediately after the standing BP and pulse measurement have been obtained and recorded, turn the power off to the machine.
After the BP and pulse reading, ask the participant “Did you experience dizziness or light headed feelings when standing for this assessment?”
After the BP and pulse reading, ask the participant “Did you experience dizziness or light headed feelings when standing for this assessment?”
As a note, the Omron device will “clear” itself of all previous readings after a 5-min interval. Moreover, the Omron does not permit downloading readings to another electronic device. Thus, recording the blood pressure and pulse readings in a timely
manner is essential.3.2.3.1 Repeating Automated Measurements
Occasionally, you may observe large differences between the 3 measurements even in the absence of the circumstances described above. For SPRINT, sets of measurements may be repeated once if the spread between the largest and smallest values of either systolic or diastolic pressures exceed 10 mm Hg. You should NOT repeat measurements when the difference is less than 10 mmHg.
If repeating the measures is needed, the full measurement protocol should be repeated, including the 5 minute rest period and a new set of 3 measurements should be collected.
If a difference between measurements of more than 10 mm Hg is again observed in the second set of measurements, the second set of measurements should still be used for data collection and a note should be recorded in the participant chart so that repeated measurements can be avoided in the future.
3.2.3.2 Proper technique for obtaining seated blood pressure and pulse in participants with arms too large for the Omron (> 50 cm circumference) or in other situations where the Omron cannot be
Start here.


