
The indirect ophthalmoscope is an excellent tool for eye examination. The instrument allows a clinician to examine the retina with much greater ease and accuracy than the direct ophthlmoscope. And any primary care clinician can learn to use it with a “practice eye”.
The problem is that an indirect ophthaloscope is expensive, $1500 and up. And if you want to take pictures of the retina for your records, you need a very expensive photo attachment (perhaps an extra thousand dollars or more).
Here is an awesome concept: the smart phone indirect ophthalmoscope and retinal camera that costs only $200 (for the handheld condensing lens your will need to purchase).
In this post I include resources on how to make your own indirect opthalmoscope and retinal camera using your smart phone.
In order to learn indirect ophthalmoscopy you will need to make your own practice eye. Here is an article on how to make a DIY practice eye that you can use to learn indirect ophthalmoscopy. See Resource (1) below.
Resource (2) is an article on smart phone fundoscopy from EyeWiki.
And in Resource (3) there is a discussion of a software app for your smartphone, Filmic Pro, available for both iPhone and Android that will allow you to improve the quality of your retinal photographs. You can purchase and download the app from the iPhone App Store and from Google Play. [These are not affiliate links.]
In order to get an adequate fundus exam with indirect ophthalmoscopy you need to dilate the patient’s eyes with dilating eye drops such as 1% tropicamide* or 2.5% phenylephrine**.
*tropicamide (Rx) – Brand and Other Names:Mydriacyl, Tropicacyl from Medscape Reference.
**phenylephrine ophthalmic (Rx, OTC) – Brand and Other Names:Altafrin, Neofrin, Refresh Redness Relief from Medscape Reference.
For more on optometric/ophthalmologic drugs see Resource 7 below, 2019 CLINICAL GUIDE TO OPHTHALMIC OPHTHALMIC, 23rd Edition DRUGS, a Supplement to Review Of Optometry supported by an unrestricted grant from Bausch + Lomb.
You will need to purchase a hand held “condensing lens” to use your DIY indirect ophthalmoscope. See Resource (1) below for more information. This lens will cost around $200 on Amazon – Ocular Instruments MaxLight 20D Indirect Ophthalmoscopy Lens [This is not an affiliate link; I just put it in for readers convenience. I have no experience with this lens.].
I just purchased a 20D double aspheric handheld lens on ebay [not an affiliate link]. I have not yet received it so I don’t know if the quality will be adequate.]
And here is a resource that you can go to to learn more about these lens:
Condensing Lenses: Sharpen Your Skills in Choosing and Using, Published March 15, 2017 by Review Of Optometry [Resource 6 below].
So now let’s go through some videos that will help speed your learning:
This great YouTube video, Retinal photography with smartphone, is from Dr. Espinosa.
First let’s watch a great introduction to direct ophthlmoscopy, Fundoscopy in 5 min, by Dr. Fiona Carley. In the video Dr. Carley gives us a clear explanation of why direct ophthalmoscope pictures never look like the pictures in textbooks and on the web. Those photos are actually taken with an indirect ophthalmoscope.
So after we’ve watched Fundoscopy in 5 Min, we’ll watch Dr. Espinosa’s YouTube video Retinal photography with smartphone. Dr. Espinosa’s video shows us how to use our smart phone as an indirect ophthalmoscope and how to use the video function of our smartphone to create retinal photos. Brilliant!
And I’ve added additional resources below which you will find helpful.
Resources:
(1) A simple model for teaching indirect ophthalmoscopy [PubMed Abstract] [Full Text] [Full Text PDF]. Br J Ophthalmol. 2006 Oct;90(10):1328-9.
(2) Smart Phone Fundus Photography [PubMed Abstract] [Full Text HTML] [Full Text PDF]. J Vis Exp. 2017; (125): 55958. Published online 2017 Jul 6. doi: 10.3791/55958
(2) Smartphone Funduscopy-How to use smartphone to take fundus photographs from EyeWiki of The American Academy of Ophthalmology:
Background
With the drastic improvement in smartphone optical and sensory capabilities over the previous decade, using smartphones in fundus imaging is becoming a more powerful clinical tool, particularly in low-resource settings where high-end informatics infrastructure and imaging systems for teleophthalmology are not as widely available. Smartphone photography and videography has been used with increasing frequency since 2010, as first reported by Lord and colleagues.[1] Currently, there are at least five known apparatus/software package solutions on the market: DigiSight Paxos Scope (San Francisco, USA)[2], Peek Retina (London, UK)[3], D-EYE (Padova, Italy)[4], Remidio Fundus on Phone (Bangalore, India)[5], and Welch Allyn Panoptic with iExaminer (Skaneateles Falls, USA). In general, these setups offer mechanical stabilization of hardware along the pupillary axis with ideal light control through an external light source and reduction of ambient light pollution. Other academia-based smartphone attachments/apparatus have been developed and tested using general principles of direct and indirect ophthalmoscopy.[6][7][8][9][10] While quality of smartphone-captured media cannot compare to higher-end fundus cameras[11], the widespread availability, built-in data transmission capability, and of course necessity to image at the point-of-care overweigh to deficits in image resolution.
The simplest, lowest-cost setup is using a smartphone and an indirect condenser lens in patients with dilated pupils.[7][12][13][14][15] Software applications are numerous in an ever-changing landscape. Devices running iOS (Apple Inc, Cupertino, USA) and Google Android OS-running smartphones will continually receive improved native camera application through periodic updates. For a more robust software, we recommend ProCamera (Cocologics GmbH) on iOS devices for its price, manually-adjustable focus, zoom, exposure setting, and light intensity. FiLMiC Pro (FiLMiC Inc) is available on both iOS and Android; it offers greater quantity and magnitude of settings manipulation than ProCamera, though at a premium, and has been successfully deployed by Mukai and colleagues.[14][16]
All articles published to date on this topic have been targeted at practicing ophthalmologists and residents; moreover, more medical students than ever are committed to working in global health, especially internationally-based eye care systems, and may find a primer on ophthalmic imaging useful in their pursuits. We therefore present a technique for smartphone fundus imaging intended for an audience of medical students.
(3) Simple, Inexpensive Technique for High-Quality Smartphone Fundus Photography in Human and Animal Eyes [PubMed Abstract] [Full Text HTML] [Full Text PDF]. J Ophthalmol. 2013;2013:518479. doi: 10.1155/2013/518479. Epub 2013 Sep 19.
The above article also recommends the use of Filmic Pro App for both iPhone and Android phones because the app permits higher quality photos with your phone.
Abstract
Purpose.
We describe in detail a relatively simple technique of fundus photography in human and rabbit eyes using a smartphone, an inexpensive app for the smartphone, and instruments that are readily available in an ophthalmic practice. Methods. Fundus images were captured with a smartphone and a 20D lens with or without a Koeppe lens. By using the coaxial light source of the phone, this system works as an indirect ophthalmoscope that creates a digital image of the fundus. The application whose software allows for independent control of focus, exposure, and light intensity during video filming was used. With this app, we recorded high-definition videos of the fundus and subsequently extracted high-quality, still images from the video clip. Results. The described technique of smartphone fundus photography was able to capture excellent high-quality fundus images in both children under anesthesia and in awake adults. Excellent images were acquired with the 20D lens alone in the clinic, and the addition of the Koeppe lens in the operating room resulted in the best quality images. Successful photodocumentation of rabbit fundus was achieved in control and experimental eyes. Conclusion. The currently described system was able to take consistently high-quality fundus photographs in patients and in animals using readily available instruments that are portable with simple power sources. It is relatively simple to master, is relatively inexpensive, and can take advantage of the expanding mobile-telephone networks for telemedicine.
2.1. Technique
Smartphone fundus images were captured with an iPhone 4 or iPhone 5 (Apple Inc., Cupertino, CA, USA) and a 20D lens (Volk Optical Inc., Mentor, OH, USA) with or without a Koeppe lens (Ocular Instruments, Bellevue, WA, USA). By using the coaxial light source of the phone, this system worked as an indirect ophthalmoscope that captured a digital image of the fundus in the smartphone camera [2]. The application (app) Filmic Pro (Cinegenix LLC, Seattle, WA, USA; https://filmicpro.com/) (Figure 1) was used because its software allowed for independent control of the focus, exposure, and light intensity during video filming. With this app, high-definition videos of the fundus were recorded for subsequent high-quality, still-image extraction. Without this app, it was extremely difficult to obtain good quality fundus images. [Emphasis Added]
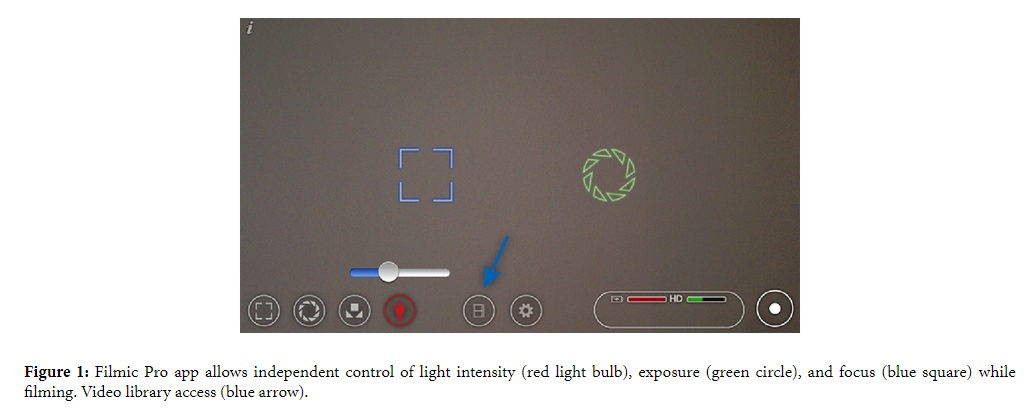
This technique of smartphone fundus photography involved multiple steps that are described in detail below. The technique is simple, yet it may take a few attempts to master since the user must learn to readjust the filming distance for focusing with the 20D lens while looking into an inverted image of the fundus on the iPhone screen. In addition, since the camera lens is usually located in the corner of the smartphone and the digital display is in the center of the phone, the parallel but skewed alignment necessitated by this displacement required some practice to get the fundus images in the center of the screen (Figure 2). Good pupillary dilation prior to filming was ideal as this allowed for easier imaging of the fundus. Before filming, the Filmic Pro app had to be configured to allow for proper control of light intensity, exposure, and focus. In the latest update of this app (Filmic Pro V 3.2), independent control of the iPhone light intensity was available, and for best exposure, the light intensity was set to its lowest level (Figure 1—light bulb). When using the older versions of the app in which there was no independent control of light intensity, we placed a strip of Micropore paper medical tape (3 M, St. Paul, MN, USA) over the light source in the front of the phone to reduce the light intensity adequately for successful image acquisition. The exposure lock was set to “off” since independent control of the exposure was needed in order to toggle the exposure control to the desired area of the fundus to be imaged (Figure 1—green circle). Finally, the focus lock was set to “off” in order to maintain independent control of the camera’s focus during the imaging of the desired area of the fundus as it appeared on the screen (Figure 1— blue square).
(4) Ophthalmoscopy for Medical Students and Primary Care Physicians from EyeWiki of The American Academy of Ophthalmology:
Find willing patients who can have their eyes dilated
In a similar manner to detecting organomegaly by palpation or cardiac murmurs by auscultation, optimization of the learning condition by viewing the fundus through dilated pupils will help immensely in identifying normal anatomy as well as pathology. Using the ophthalmoscope through an undilated pupil requires more skill, so finding willing dilated patients will help to foster comfort and then confidence. Dilating eye drops such as 1% tropicamide or 2.5% phenylephrine are readily available in most eye clinics and one drop of each will dilate a pupil.
(5) Binocular Indirect Ophthalmoscopy from EyeWiki of The American Academy of Ophthalmology.
(6) Condensing Lenses: Sharpen Your Skills in Choosing and Using, Published March 15, 2017 by Review Of Optometry
(7) 2019 CLINICAL GUIDE TO OPHTHALMIC OPHTHALMIC, 23rd Edition DRUGS, a Supplement to Review Of Optometry supported by an unrestricted grant from Bausch + Lomb.


