
This post is about how to perform the lung ultrasound exam. The three resources I have included are all you need to get started on the lung ultrasound exam.
For additional information on all aspects of primary care office ultrasound [also called Point Of Care Ultrasound (POCUS)], go to the Categories box and click on “Select Category”. In the “Select Category List you will then click on “Ultrasound Imaging”. There are over 80 posts on various aspects of ultrasound imaging.
The following are excerpts from Resource (1) below, Clinical review: Bedside lung ultrasound in critical care practice which discusses the technique of how to perform the lung ultrasound scan:
[The Ultrasound Probe]
Ideally, an emission frequency of 5 to 7 MHz is desirable for optimizing ultrasound visualisation of the lung. The probe should be small with a convex tip so it can be easily placed on intercostal spaces, which offer an acoustic window on the lung parenchyma. Generally, a convex array probe (3 to 5 MHz), as available on multi-purpose ultrasound machines, combines these advantages and allows a good visualization of lung.
Lung ultrasound examination
The patient can be satisfactorily examined in the supine position. The lateral decubitus position offers, however, a better view on dorsal regions of lower lobes. A complete evaluation of both lungs requires a systematic protocol of examination. First, the operator should locate the diaphragm and the lungs. Lung consolidation or pleural effusion are found predominantly in dependant and dorsal lung regions and can be easily distinguished from liver or spleen once the diaphragm has been located. Using anterior and posterior-axillary lines as anatomical landmarks, each chest wall can be divided into six lung regions that should be systematically analyzed: upper and lower parts of the anterior, lateral and posterior chest wall. In a given region of interest, all adjacent intercostal spaces offer acoustic windows that allow the assessment of the lung surface by moving the probe transversally. Dorsal lung segments of upper lobes, located behind the scapula, are the only regions that cannot be explored by lung ultrasound. To provide an exhaustive assessment of lung aeration and pleural effusion, the ultrasound examination should cover both lungs, just as for auscultation. To be comprehensive, a chest ultrasound examination should take around 15 minutes, although with enough knowledge and skills, users can perform lung examination more quickly.
The exam can be performed much more quickly then 15 minutes once the operator is experienced. Each of the six views are easily and quickly obtained and only 15 seconds of recording is needed for each view. The patient can quite adequately be scanned in the supine position which will only take five minutes with an experienced examiner.
The following are excerpts from Resource (2) below, Ultrasound for “Lung Monitoring” of Ventilated Patients:
Lung Ultrasound Examination
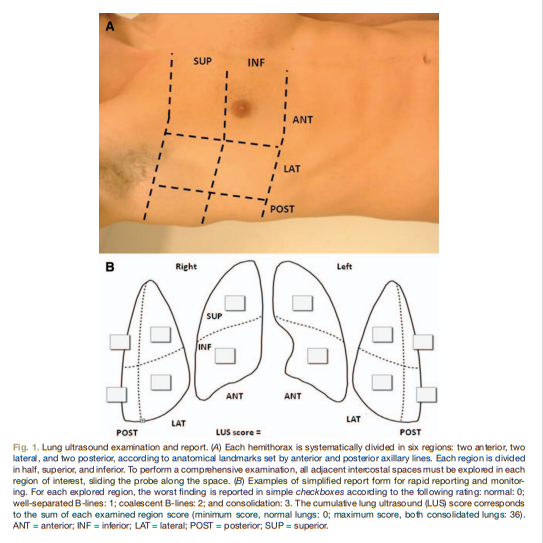
It must be performed according to a systematic protocol of examination.9 LUS is normally performed in supine patients. Operator should firstly locate the diaphragm and the lungs. Lung consolidation or pleural effusion is found predominantly in dependent and dorsal lung regions and can be easily distinguished from liver or spleen once the diaphragm has been identified. By using the anterior and posterior axillary lines as anatomical landmarks, three areas per hemithorax (anterior, lateral, and posterior) can be identified. Each area is divided in two, superior and inferior. In a given region of interest, lung surface of all adjacent intercostal spaces must be explored by moving the probe transversally. *9 Posterior areas can be more extensively examined (until the spine) if a slight patient rotation on the contralateral side is performed; posterior superior area is sometimes difficult to evaluate because the scapula can determine a blind spot (fig. 1).
*If you are performing a screening ultrasound lung exam in an asymptomatic patient it is only necessary to scan one interspace in each of the six scanning areas pictured below.
And here is an excellent YouTube video, Ultrasound Lung Scanning Tutorial with Dr. Shane Arishenkoff – Clarius from Clarius Ultrasound:
Resources:
(1) Clinical review: Bedside lung ultrasound in critical care practice [PubMed Abstract] [Full Text HTML] [Full Text PDF]. Crit Care. 2007;11(1):205.
(2) Ultrasound for “Lung Monitoring” of Ventilated Patients [PubMed Abstract] [Full Text HTML]. Anesthesiology. 2015 Feb;122(2):437-47. doi: 10.1097/ALN.0000000000000558.
(3) Ultrasound Lung Scanning Tutorial with Dr. Shane Arishenkoff – Clarius – This is an excellent YouTube video from Clarius Ultrasound.
Dr. Shane Arishenkoff is the ultrasound lead for the UBC Division of General Internal Medicine. In this 15-min video, he walks us through the process of scanning human lungs. Dr. Arishenkoff discusses lung settings, transducer selection, a systematic approach to scanning the lungs, as well as optimization and interpretation of lung images.


